CONNECTIONS:
The BDP-93 supports a ton of formats, including quite a few that require some special consideration when connecting the player.
Multichannel Analog: This is one of the key features of the BDP-93 that makes it a good match for the Model 1050 and all of the other surround receivers and processors that lack HDMI audio support. If you want to hear the full effect of Dolby TrueHD, DTS-HD Master Audio, multichannel PCM, DVD-Audio, or SACD, you need to hook this up. Because the Model 1050's multichannel analog input is a 5.1 input rather than 7.1, hook up all of the BDP-93's multichannel analog outputs except for the back surround speakers (SBL and SBR).
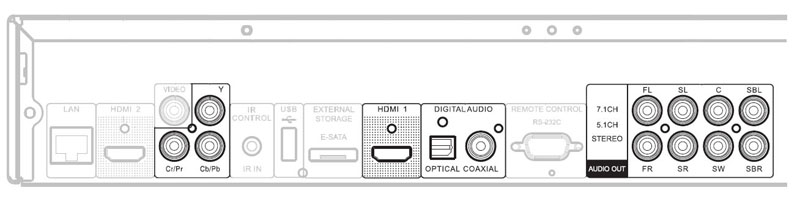 BDP-93 rear panel
Coaxial/Optical Digital: You may want to connect a coaxial or optical digital cable, as it can be used for DVD's and CD's to allow you to rely on the Model 1050's DSP modes. The BDP-93's internal DSP is in some ways the more advanced of the two, though, so this is not something you necessarily need to do. Make a note of the digital audio input you connect to (coaxial, optical1, or optical2).
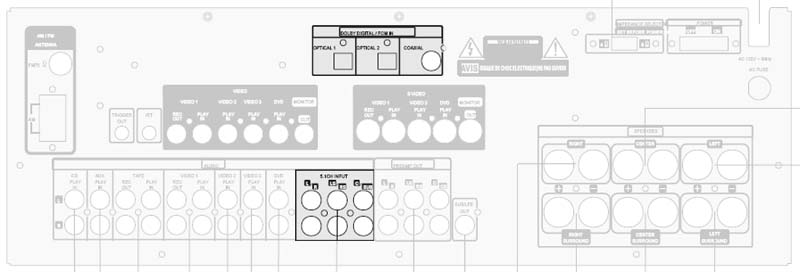 Model 1050 rear panel
HDMI: The BDP-93's Marvell QDEO video processing is excellent, but it is only applied to the HDMI1 output. If your HDTV has either an HDMI or a DVI-HDCP input, connect directly to it from the BDP-93. The BDP-93 comes with a good HDMI cable, and if you have a DVI display you can get an HDMI-to-DVI adapter or buy an HDMI-to-DVI cable (like
MODEL 1050 SETUP:
DVD or Video Input: If you plan to use the digital input, you'll want to set up an input to use that input. I'll use the DVD input for the sake of this FAQ, but any input could be used for this. To do this, change to the desired input and use the "DIGITAL" button on the remote to select the digital input you connected earlier (coaxial, optical1, or optical2).
Multichannel Analog Input (6CH): To use the multichannel analog input, you don't need to set up anything. You will simply use the "6CH" button on the remote to select the multichannel analog input. The "6CH" button doesn't change the video switching, but you'll be bypassing the Model 1050's video switching anyway.
return to top
BDP-93 SETUP:
Quick Setup Wizard: The first time you turn on the BDP-93, it will offer to let you run through a quick setup wizard. This wizard has six screens, which are outlined below.
- The first screen will let you agree to proceed with the wizard. If you do this (and I recommend you do), you will enter the wizard.
- Once you are in the wizard, the second screen will let you select between HDMI1, HDMI2, and component. As we've already said, HDMI1 is much preferable. Select the video output that you are using (typically HDMI1).
- The third screen lets you select the output resolution. The rule of thumb here is to get as close as possible to your display's native resolution. For a 1080i HDTV (such as the direct-view CRT I used for a number of years), that would be 1080i. For a 768-line display (such as many plasma, smaller or older LCD's, or older DLP rear projection TV's), 720p is often the best place to start. (You may want to experiment with 1080i or 1080p later.) For a newer 1080p display, 1080p is of course preferred. And if you have an outboard video processor, Source Direct will let you make best use of that processor. The player will test the resolution, and if it is compatible with your display you will see a message asking you to confirm your choice.
- The fourth screen will let you pick the aspect ratio. For a 16:9 display (which is going to include almost all HDTV's), you will want either 16:9 Wide or 16:9 Wide/Auto. Wide/Auto will pillarbox 4:3 video to preserve the original aspect ratio. Wide will stretch 4:3 video to fill a 16:9 screen. I use 16:9 Wide/Auto.
- The fifth screen will ask if you want to use "compatible" or "advanced" audio support. Select "compatible" to provide the best initial audio settings for use with the Model 990.
- After that, the sixth screen will end the wizard. You can then enter the player's setup menu and make additional adjustments.
Audio Format Setup: The BDP-93's manual has an excellent section in the manual that suggests settings for this menu based on how you are connecting the player. I'll offer some suggestions for the specific case of the Model 1050. Secondary Audio can be set to "on" without compromising sound quality of primary audio tracks. Since you are using analog and coaxial/optical outputs for audio, the HDMI Audio setting doesn't matter, but I would set it to "Off" anyway. This will prevent your TV from getting an audio signal. SACD Output can be set to either PCM or DSD. When DSD is selected, the SACD's DSD bitstream is sent straight to the DAC. If you have SACD's, you might experiment with these two settings to find which one you think sounds better. Coaxial/Optical Output should be left set to "Bitstream" and the LPCM Rate Limit can be left at "48K".
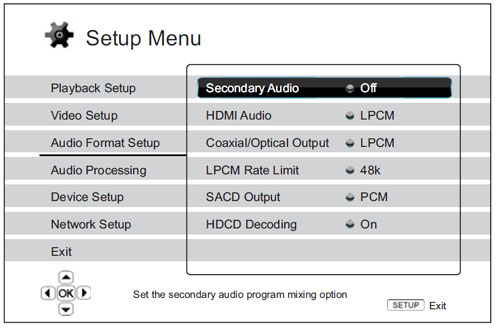 BDP-93 Audio Format Menu
Audio Processing: This menu has three entries, but the first one covers a lot. We'll look at that one - Speaker Configuration - first. This menu option brings up a screen that shows every speaker in the room as well as an option for setting the "Downmix." Because the Model 1050 does not provide bass management at the 6CH analog input, you will want to set each speaker to "small" (or "on" for the subwoofer) and set the distances to the same values used in your Model 1050 setup. Initially set the trims to "0" (their default values) for all speakers except the subwoofer. In some experimenting that I did with a BDP-83 and Model 990 (specifically Outlaw Saloon member UMtiger's system), we found that a trim setting of "+10" worked best, which we suspect is compensating for the way surround mixes reduce the LFE channel by 10dB. This setting may also be appropriate for the Model 1050. I would suggest taking the time at some point to use the BDP-93's internal test tones or a calibration disc like Digital Video Essentials (either the old DVD or the new "HD Basics" Blu-ray) to check the trim settings for the speakers, but if you are in a hurry the trim settings used in the Model 1050 setup are a good place to start. You will also want to select the "5.1Ch" downmix setting. If you have a system that uses fewer speakers than 5.1 (no surrounds, for example), you can set those speakers' size to "Off" instead of "Small" and the BDP-93 will downmix appropriately for your situation. The BDP-93 also offers a setting in the Audio Processing menu for Dolby Pro Logic II. I suggest setting this to "Off" and using the coaxial or optical connection if you have a mono or stereo disc that you want to expand to surround, but you may want to experiment with playing DVD's via the multichannel analog output with Pro Logic II enabled and compare that to what you get from a coaxial or optical connection to the Model 1050. The last control is DRC (Dynamic Range Control). This setting only applies to Blu-ray Discs, and I would suggest either "Auto" or "Off". Auto may help with audibility of low-level audio when listening at lower volumes.
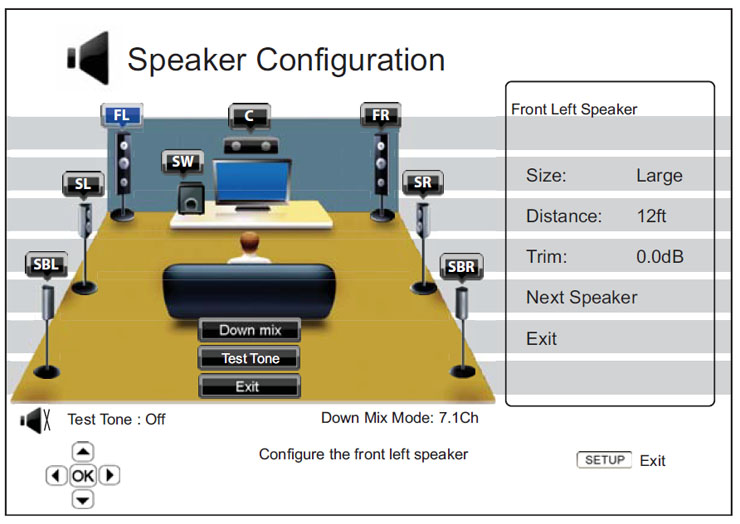 BDP-93 Speaker Configuration Menu
After you've made the changes to the BDP-93's menus, turn the player off and back on to save the settings permanently.
return to top
Page created 1/2/2011