Setup Guide: Outlaw Audio Model 970/Model 1070
and OPPO Digital BDP-83

Last updated 6/23/2009


CONNECTIONS | MODEL 970/1070 SETUP | BDP-83 SETUP


CONNECTIONS:

The BDP-83 supports a ton of formats, including quite a few that require some special consideration when connecting the player.

Multichannel Analog: This is one of the key features of the BDP-83 that makes it a good match for the Model 970 and 1070 and all of the other surround receivers and processors that lack HDMI audio support. If you want to hear the full effect of Dolby TrueHD, DTS-HD Master Audio, multichannel PCM, DVD-Audio, or SACD, you need to hook this up. If you have a 7.1 speaker setup, hook up all eight channels. If you have a 5.1 speaker setup, hook up all except for the rear surround speakers. Remember that the left and right channels are connected to the DVD input's left/right jacks, which are below the cluster of inputs for center, sub, left/right surround, and left/right rear surround.


BDP-83 rear panel

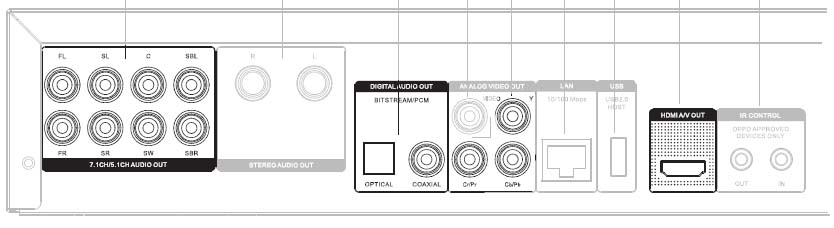
Coaxial/Optical Digital: I would recommend at least connecting a coaxial or optical digital cable, as it can be used for DVD's and CD's to allow you to rely on the Model 970/1070's DSP modes. This is the only way to get Dolby Digital EX, DTS ES, Pro Logic IIx, or 5/7 Stereo with DVD's and CD's. Make a note of the digital audio input you connect to (coaxial1 through coaxial3, or optical1 through optical3).


Model 970/1070 rear panel

DVI/HDMI: The BDP-83's ABT 2010 video processing is excellent, but it is only applied to the HDMI output. If your HDTV has either an HDMI or a DVI-HDCP input, use it with the BDP-83. You can connect directly to the display, or you can use the Model 970/1070's DVI switching. If you do plan to use the DVI switching, connect to DVI1 (DVD) so it can be used with the multichannel analog input.

I've started suggesting that folks who are connecting HDMI sources to HDMI displays through the 970/1070's DVI switching for the first time use an HDMI-to-DVI adapter at the Model 970/1070 and buy HDMI cables. This way, you can invest in HDMI cables that can be retained even if you replace the Model 970/1070 later. You can also use the HDMI cable provided with the BDP-83. If you already have HDMI-to-DVI cables in place, however, you can also simply use those.

Component: In most cases, there's no need to connect component video from the BDP-83. You should only use the BDP-83's component output if your HDTV lacks an HDMI or DVI-HDCP input. Frankly, if you are in that case you may also want to consider something like the "HD Fury" products that will allow you to use the HDMI output of the BDP-83 (thus gaining access to the ABT2010). If you do find yourself using component video and you are using the Model 970/1070's component switching, connect to the DVD component input so it can be used with the multichannel analog input.

return to top


MODEL 970/1070 SETUP:

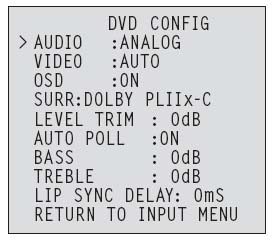
DVD Input: The DVD input is tied to the 7.1 analog input and to the DVD component and DVI1 (DVD) input. If you are using component video, select "COMPONENT" for "VIDEO". If you are using DVI or if you are bypassing the 970/1070 with your video, this isn't necessary as the VIDEO setting isn't going to matter. If you are planning to use both 7.1 analog and coaxial/optical digital for audio, set the "AUDIO" control to the digital input you used earlier (coaxial1 through coaxial3 or optical1 through optical3). In that case, you will use the "7.1" button on the remote to toggle between this digital input and the 7.1 analog connection. If you plan to only use the multichannel analog connection, you can set "AUDIO" to "EXT 7.1" and the 970/1070 will always use the multichannel analog connection for the DVD input.


Model 970/1070 Video Input menu

Bass Management Switch: The BDP-83 has a really good analog section. I'd suggest setting the rear panel's bass management switch to "HPF/LPF" initially, although you can also try the "DIGITAL" position to see which one sounds better to you.

return to top


BDP-83 SETUP:

Quick Setup Wizard: The first time you turn on the BDP-83, it will offer to let you run through a quick setup wizard. This wizard has six screens, which are outlined below.

  1. The first screen will let you agree to proceed with the wizard. If you do this (and I recommend you do), you will enter the wizard.
  2. Once you are in the wizard, the second screen will let you select between HDMI and component. As we've already said, HDMI is much preferable. Select the video output that you are using (typically HDMI).
  3. The third screen lets you select the output resolution. The rule of thumb here is to get as close as possible to your display's native resolution. For a 1080i HDTV (such as the direct-view CRT I used for a number of years), that would be 1080i. For a 768-line display (such as many plasma, smaller or older LCD's, or older DLP rear projection TV's), 720p is often the best place to start. (You may want to experiment with 1080i or 1080p later.) For a newer 1080p display, 1080p is of course preferred. And if you have an outboard video processor, Source Direct will let you make best use of that processor. The player will test the resolution, and if it is compatible with your display you will see a message asking you to confirm your choice.
  4. The fourth screen will let you pick the aspect ratio. For a 16:9 display (which is going to include almost all HDTV's), you will want either 16:9 Wide or 16:9 Wide/Auto. Wide/Auto will pillarbox 4:3 video to preserve the original aspect ratio. Wide will stretch 4:3 video to fill a 16:9 screen. I use 16:9 Wide/Auto.
  5. The fifth screen will ask if you want to use "compatible" or "advanced" audio support. Select "compatible" to provide the best initial audio settings for use with the Model 970/1070.
  6. After that, the sixth screen will end the wizard. You can then enter the player's setup menu and make additional adjustments.

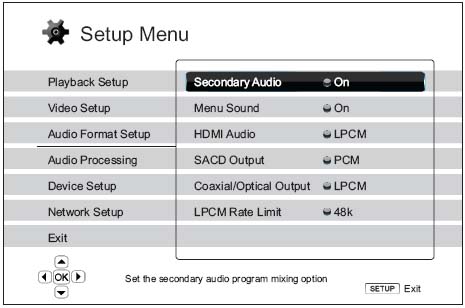
Audio Format Setup: The BDP-83's manual has an excellent section in the manual that suggests settings for this menu based on how you are connecting the player. I'll offer some suggestions for the specific case of the Model 970/1070. Secondary Audio should typically be set to "off." (The way secondary audio works, the player reverts to the lossy "core" track any time secondary audio is on and the player encounters either a BD-Java disc or a secondary audio stream on a non-Java disc. Most discs being released today use BD-Java, so it's best to leave secondary audio off unless you really want to access a secondary audio feature.) Since you are using analog and coaxial/optical outputs for audio, the HDMI Audio setting doesn't matter, but I would set it to "Off" anyway. This will prevent your TV from getting an audio signal. SACD Output can be set to either PCM or DSD. When DSD is selected, the SACD's DSD bitstream is sent straight to the DAC. If you have SACD's, you might experiment with these two settings to find which one you think sounds better. Coaxial/Optical Output should be left set to "Bitstream" and the LPCM Rate Limit can be set to "96K".


BDP-83 Audio Format Menu

Audio Processing: This menu has three entries, but the first one covers a lot. We'll look at that one - Speaker COnfiguration - first. This menu option brings up a screen that shows every speaker in the room as well as an option for setting the "Downmix." If you use the "DIGITAL" bass management switch, the Model 970/1070 provides bass management for the multichannel analog input as well as channel trim and distance delays. In that case, you will want to set each speaker to "large" (or "on" for the subwoofer) and the distances to "0ft". Also set the trims to "0" (their default values) for all speakers. When using the "HPF/LPF" setting, you will still get bass management and channel trim the same way, but you will need to set speaker distances in the BDP-83. Based on some experimenting that I did with a BDP-83 and Model 990 (specifically Outlaw Saloon member UMtiger's system), we found that a trim setting of "+10" worked best, which we suspect is compensating for the way surround mixes reduce the LFE channel by 10dB – this setting may also be appropriate for systems with a Model 970 using the "HPF/LPF" setting. You will also want to select a downmix setting that matches your setup. If you have a 5.1 system, select the "5.1Ch" downmix. If you have a 7.1 system, select the "7.1Ch" downmix. If you have a system that uses fewer speakers than 5.1 (no surrounds at all, for example), you can set those speakers' size to "Off" instead of "Large" and the BDP-83 will downmix appropriately for your situation. The BDP-83 also offers a setting in the Audio Processing menu for Dolby Pro Logic II. I suggest setting this to "Off" and using the coaxial or optical connection if you have a mono or stereo disc that you want to expand to surround. That will let you use the Model 970/1070's more extensive matrix surround processing modes. The last control is DRC (Dynamic Range Control). This setting only applies to Blu-ray Discs, and I would suggest either "Auto" or "Off". Auto may help with audibility of low-level audio when listening at lower volumes.


BDP-83 Speaker Configuration Menu

After you've made the changes to the BDP-83's menus, turn the player off and back on to save the settings permanently.

return to top


Page created 6/1/2009

Prillaman.net | Home Theater and DVD | Equipment Reviews